Alright. So when we moved in, we did have a finished basement. By finished, I mean that there was wall to wall orange carpet. I don’t blame the previous owners- the house was built in the 70’s after all. That was the style!
But 40 years later, that carpet was musty. We didn’t want carpet in the basement for many reasons. So… we pulled it up. We discovered beneath that was wall to wall troweled on adhesive. Thick. No way to paint over it. It had to be ground up no matter what we put down other than new carpet. Since new carpet was out of the question, we began the grinding process.
So, me being naive thought, “well if we are going to be grinding every little bit of adhesive up, we might as well acid stain the floors.” A nice theory indeed. Even though we did TONS of research, it still ended up being much more than I had imagined. So here was the process if you are ever considering a similar process.
So here was our starting point.


We began this project in February of 2016. Late February, my husband and his dad Mike, pulled up all the old carpet. When they were done, it looked like this by early March:


Look at all that adhesive! It’s almost like a layer of carpet it was so thick.
So then we tried scraping up the adhesive by hand. Hahahahaha. That is so laughable.
Then we rented a machine. I’m going to say this many, many times. Put up plastic sheeting and shut doors by areas you do not want concrete dust. Let me repeat that- PUT UP PLASTIC SHEETING! We did not. The consequences were severe!
Ok so off to Home Depot we went. We rented a floor grinder. See that door there? We should have shut it. And put up plastic sheeting!


After the initial floor grinding, it looked quite a bit different! Started to look like actual concrete.


This was mid-march. I was pretty pregnant. I still helped clean up concrete!!! A week later I looked like this!! 10 days after this picture, John Michael arrived!

Have I told you how sticky concrete dust is? Trust me. That stuff is worse than drywall dust. And that stuff is so bad too. It is horrible to clean up. Just not going to sugarcoat this one- sorry!
Alright- so then the project took a big break because JM was born. Turns out he needed a bit of our time! 🙂

Alright. So let’s fast forward a year. Over the past year, (not pictured) we would fuss here and there with grinding. It took a very long time. Joe had to then use a small angle grinder to get up near the walls. In March of 2017, it looked like this.


Look at my handsome concrete man!
Then, not pictured is the thousands (ok it feels like it) of times we had to wash the concrete before staining.
The staining took like two seconds. I should have taken a picture of this too, but forgot. (We used Eagle Concrete Stain from the Home Depot. Here’s the link: http://www.homedepot.com/p/Eagle-1-gal-Rustic-Concrete-Acid-Stain-EDADR/203012900 We also used the other Eagle products to prepare the concrete before we stained and also Eagle sealer and wax when we finished the project. I will say we did really like the product itself).
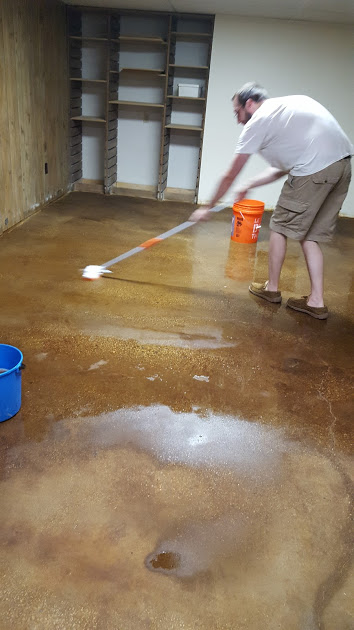
So then once the stain was on, we had to wash it again another thousand times. (But seriously, probably a hundred). We had to wash it until the water was clear. The struggle was real.
A few videos of this arduous process!
As you can see in the above videos- it took a very long time for that water to come close to clean. We used a variety of methods. Mopping, shop vacuuming, etc. Many many cleanings.
Then once it was clean, we sealed and waxed it. When this was finished, it looked like this!


Remi did not enjoy being separated. 😦
Then I painted all the walls a fresh white. JM helped me go buy the paint!


Remember all that concrete dust I was talking about? I had to wash every single belonging free of concrete dust. Pro tip- block those sections off if you can. If not, vinegar and dish soap with warm water works well! I wiped it with that solution and dried with fresh paper towels.


I used J’s old sign for motivation!

Then I painted the work area- benches are a high gloss white. Walls white. The floor is porch and floor paint in a custom gray.


Finally, we hooked up the tv. Then put our furniture and belongings back. Lots of cleaning and organizing. But the end result is fantastic. We love it!


Remi likes it, we can tell!
So the things we still have to do: touch up the area where the carpet trim used to meet the bare floor by the wood stove, touch up the bar a bit- there is a still a bit of carpet on the bottom, and switch out all the tan plugs for white ones. And I’m pretty sure we’ll have some little things and cleaning to do. Perhaps will update the ceiling in the future.
For now, we are done! And now we are about to eat some pork tacos in our new space!

This looks great! We are about to do the same thing. How many coats did you guys do?
LikeLike
Erin: so sorry I’m just now replying! Do you mean the stain or protectant on top? Honestly, I can’t remember with the stain. What really sticks out is moping it over and over again until the mop came up clear before putting on protectant! I feel like just one coat of stain took because we’d done so much prep with the concrete behforehand. I also did a few coats of sealer. Sorry I wasn’t much help. 😦
LikeLike